
Aerobie, the company that invented the Aeropress, is not a coffee company by origin. Their first product was actually the Aerobie Pro – A flying disk. Alan Adler, the founder of the company, had invented many disk-like toys before he invented the Aeropress. Today, Aeropress is Aerobie’s #1 product and an extremely popular method of one cup brewing. The Aeropress produces an espresso strength coffee and as a result, has become known as the “poor man’s espresso.” Aeropress is a pretty easy brew and only takes around 10 minutes. What You Need Aeropress Tools Included Water Coffee Circular Filter Gooseneck Kettle Grinder Directions Amounts : 1 scoop coffee & 12 oz water 16 grams coffee & 355 grams water Ground : You’ll want one heaping Aeropress scoop of finely ground coffee to start – a #4 grind on industrial machines. Water : To prepare your water, bring it to a boil and then remove from heat. Never pour boiling water straight onto coffee grounds – it will scorch them and give your coffee a burnt flavor. Allow the water to cool for 30 seconds (the temperature should be between 195-205) before you proceed to the next step. Filter : Place the paper filter into the plastic filter, screw it onto the Aeropress and set it over your mug. From here, you can wet the filter with your hot water, to remove the papery taste and heat your press and mug. Dump out the water before proceeding. Bloom : Drop the grounds into the cylinder, and add just enough water to cover them. Let them bloom for 30 seconds before continuing. Adding Wate r: After the bloom, pour more hot water into the Aeropress, until the water level is just above the blue number 3. Final Steps : Use the paddle that comes with your press to give the grounds a stir for about 5 seconds, then place the plunger into the tube. From here, slowly press the coffee through the filter until you hear a hissing noise. Enjoy! - Add hot water for an americano, Steam milk for a latte, or drink it straight.
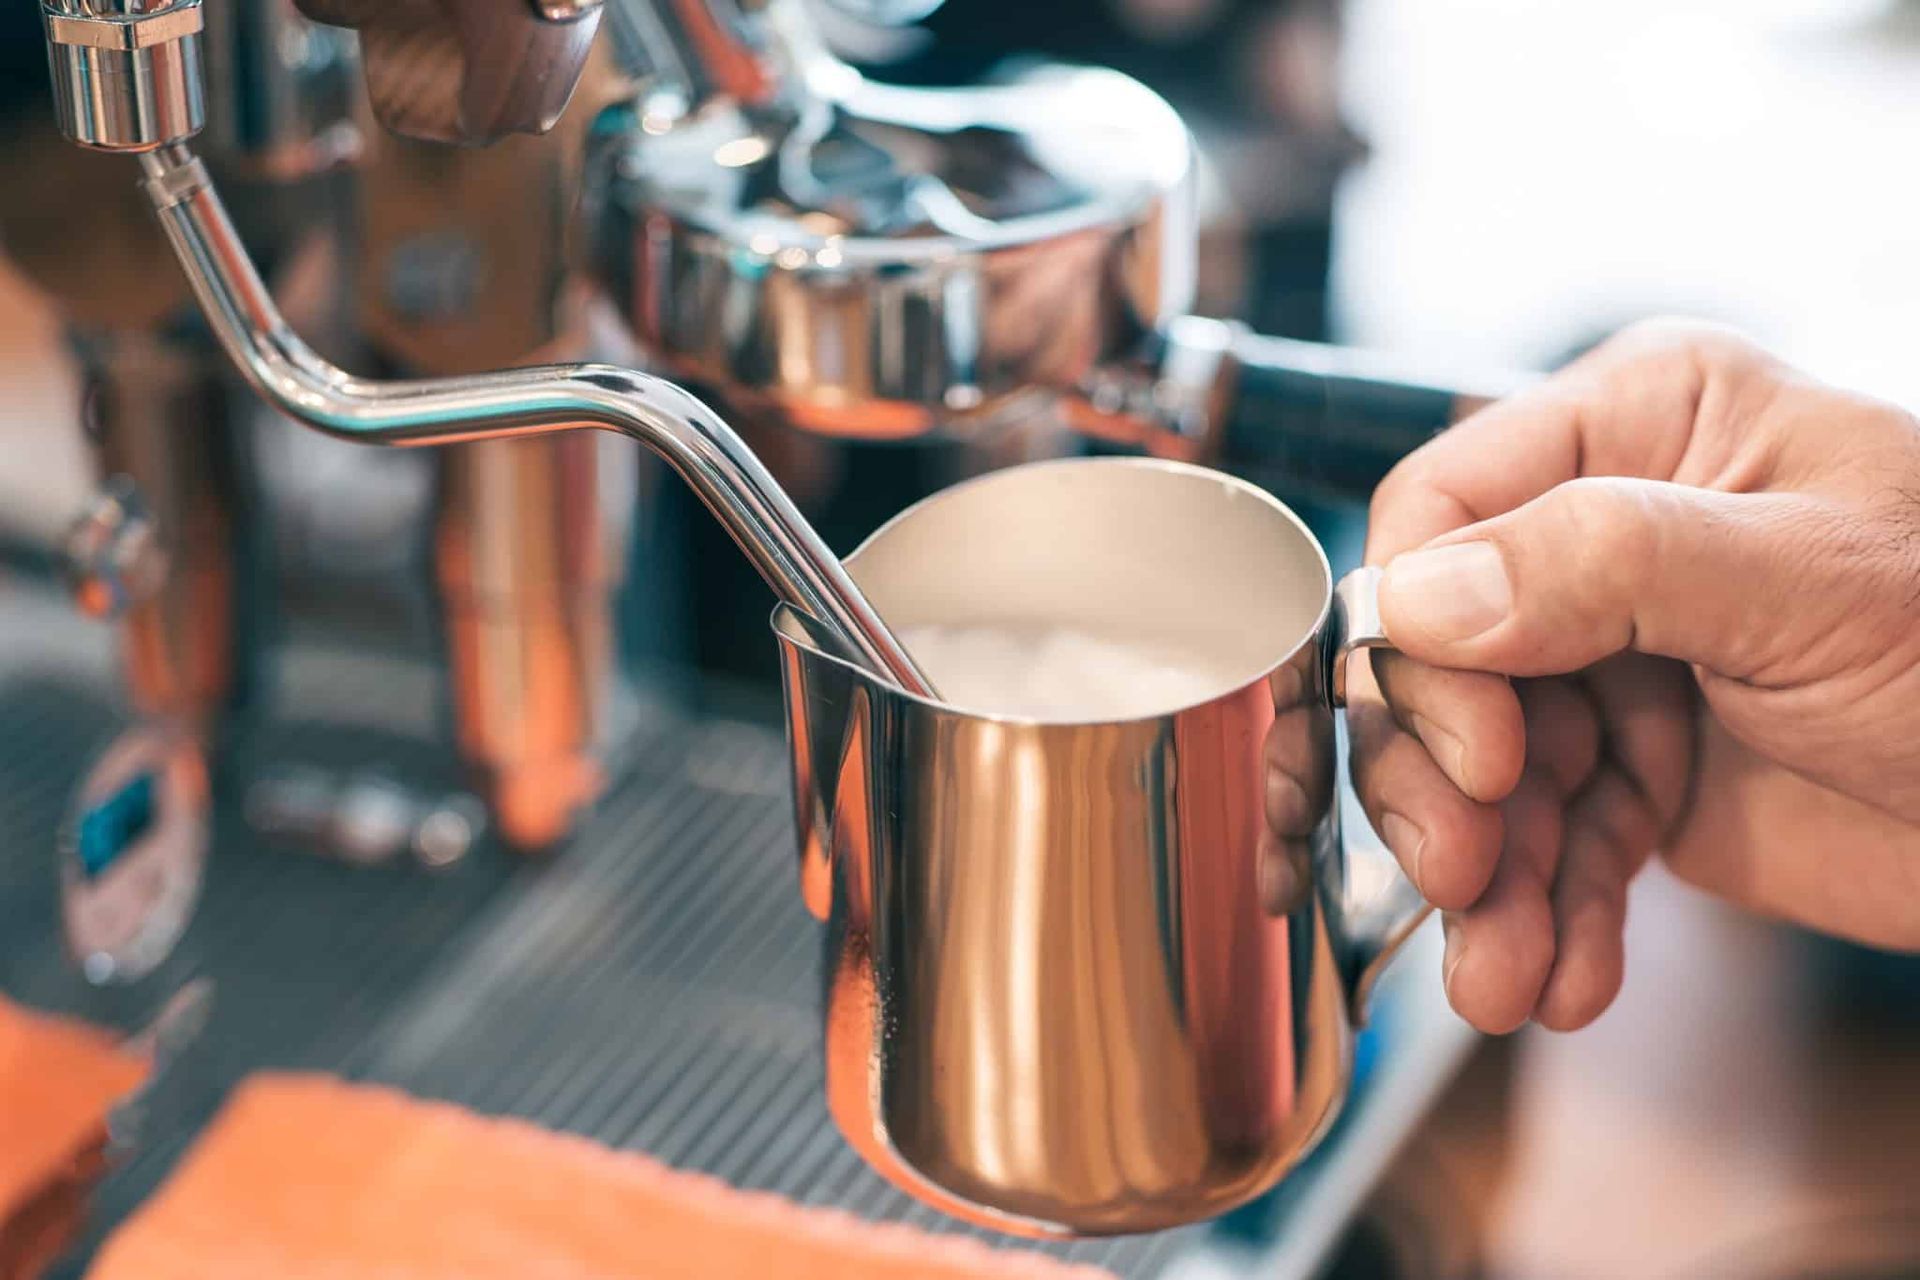
The art of steaming milk is tricky, but worth the dedication required to learn. Keep a close eye on all the small details, and with practice you can become a true pro. Steaming milk can be difficult, and takes around 4 minutes to do. What You Need Milk Espresso Machine with a steamwand Pitcher Cloth Directions Pour Milk : To start, pour milk into your pitcher till it’s about half full. You will need the extra room to properly steam your milk and achieve fantastic foam. Steaming Your Milk : Before starting the steaming process, be sure to give a quick pull on the handle to bleed the steam wand. This removes any water from the wand. Once you’ve done this, submerge the wand in the milk and begin to steam. Slowly lower the pitcher so just the tip is submerged. Small microfoam will begin to form and the milk will expand. Do this slowly so that no large bubbles are created. The milk should swirl like a whirlpool and incorporate the microfoam into the pitcher of milk. Slowly continue to draw the pitcher down until you have your desired amount of foam. Now you can move the wand completely under the surface of the milk (but not touching the bottom of the pitcher) and hold steady. Achieving Optimum Temperature : We recommend the use of a thermometer to make sure your milk is the perfect temperature of 160 degrees. To achieve this optimum temperature steam your milk until your thermometer reaches 150 degrees, then shut off the steamwand. The milk will continue to heat a few more degrees once you shut off the steam, hitting the desired temperature of 160 degrees. Finish : Remove the pitcher from the wand, bleed the steamer once more, and wipe clean with a damp towel. This clears away any milk residue that may be left behind, so your machine will always steam properly and stay completely clean inside.

Espresso was invented as a way to make coffee expressly, as people were in a hurry and didn’t have time to wait 10 minutes to brew their morning pot of coffee. However, over the years, espresso has become more about the taste than the speed. The rich, strong flavor is something that coffee drinkers around the world look forward to every morning. Espresso is a tricky brewing method and takes roughly 4 minutes to complete. What You Need Coffee Espresso Machine Portafilter Cloth Directions Grounds : Grind your coffee on a fine grind – #1 on an industrial grinder. For a double shot, you’ll want 15 grams of coffee, which is equal to a smidge less than 2 tablespoons. Adding Grounds : Put the grounds into the portafilter so it forms a little mound on the top. Grab your tamper and press down firmly. Remove the tamper and use the handle to give the side of the filter a quick tap to remove excess grounds, then press again. Give it a quick twist before you remove it so the top is nice and smooth. Pulling Shots : Insert the portafilter into the machine, making sure that it’s fully locked into its proper position. Place shot glasses or a mug below to catch the shot. Press the button and watch as the shot begins to pour. The best shots take anywhere between 25-33 seconds from pushing the button to finish. Machine Care : Once you’ve pulled your shot, make sure you properly care for your machine and equipment. Carefully take the portafilter out, remove the used grounds, and give it a quick wipe down with a towel. You should also quickly run some water through the group head on your machine to rinse away any grounds that are stuck in the screen. Place the filter back into the machine for storage, and give your shot glasses a quick rinse. Bonus tip : If your shots are running too slow, try easing up on the tamping pressure. If they are too long, try tamping harder. If this doesn’t solve your problem, try adding slightly less grounds to the portafilter for a faster pour and adding slightly more for a longer pour. These adjustments will greatly affect the taste of your shots! Enjoy! - Whether you made a latte, americano, or some other fabulous espresso drink, enjoy sipping Camano Island Coffee Roasters – you’ve earned it.

There are a lot of ways to make iced coffee, but the Japanese Iced Coffee method is our favorite. It’s quick and easy. And, for cold-brewing, it gives you the brightest, fullest flavor possible. The full flavor is possible because brewing with hot water extracts maximum flavor while cooling instantly protects the flavor from acquiring off-flavors due to oxidization. Making Iced Chemex is an intermediate brew, and takes about 14 minutes. What You Need Chemex Pre-folded Chemex Filter Water Coffee Ice Gooseneck Kettle Grinder Directions Amounts : 2 tbsp coffee for 4oz water and 4 oz ice 4 tbsp coffee for 8oz water and 8 oz ice 8 tbsp coffee for 16oz water and 16 oz ice 16 grams coffee for 118 grams water and 118 grams ice 32 grams coffee for 236 grams water and 236 grams ice 64 grams coffee for 473 grams water and 473 grams ice Water : Bring your water to a boil and then remove from heat. Never pour boiling water straight onto coffee grounds – it will scorch them and give your coffee a burnt flavor. Allow the water to cool for 30 seconds (the temperature should be between 195-205) before you proceed to the next step. You need equal parts ice and water. We used 8oz water and 8oz ice in our Chemex. Make sure you measure out your proper water and ice amounts before beginning. Grounds : Additionally, you’ll want 4 tablespoons of coarsely ground coffee (Set an industrial grinder to a #9, or “French Press” setting. Filter : Before unfolding your Chemex filter place your Chemex filter over your sink and pour hot water (not from your pre-measured amount) over the filter. This will remove the papery taste from the filter. Ice and How to Use the Filter : Dump your ice into the Chemex, and unfold your Chemex filter. As much as you’ll want to, don’t unfold it all the way. Instead, pull just one edge away from the three others. Now your filter will resemble a normal pour-over filter. There will be one edge on one side, and three on the other. Set it into the Chemex with the crease sitting in the pouring channel. Cone filters you use for pour-over, like a #4 or #6, won’t fit properly in a Chemex and are too thin to properly filter for Chemex. Only use Chemex filters. Add Grounds and Bloom : Add the grounds into the filter and begin pouring your hot water over the grounds until they are covered. Let the grounds bloom for 30 seconds. Continue to pour the rest of your 8 oz of water over the grounds in slow, circular motions. The ice will begin to melt – that’s okay. Once the water has fully filtered through, remove the filter. Take care when pouring your iced coffee – the ice tends to slide out quickly. Enjoy! - Sit back, and enjoy your refreshing brew of Chemex iced coffee.

Coffee is a huge part of Turkish culture. In fact, traditional houses include special “coffee rooms” specifically for brewing and drinking coffee. In the 17th century, the Turks were spending more time drinking coffee than going to the mosques to pray, so the government made coffee illegal. This, however, didn’t stop the Turks from drinking coffee, and to this day it remains a rich part of their culture. This brew is difficult, but only takes about 7 minutes. What You Need Coffee Ibrik Sugar (Optional) Grinder or Turkish Grinder Water Directions Tools : The ibrik comes in many sizes. A finished cup of Turkish is considered 3oz, so the amount of water you use depends on the size of your ibrik and the number of cups you’re serving. You should never fill the ibrik past the neck. Technically, one cup is a tad bit more than 3oz, but we’re using that measurement just to keep things simple. Grounds : For every 1 cup of water, you should use 1 tablespoon of Turkish-ground coffee, which is extremely fine. The best way to get this fine of a grind is to purchase a Turkish grinder, but you can also get a similar grind by putting your grinder on the finest setting possible. You’ll find most industrial machines have a Turkish setting. Water/Adding Coffee : Put the water into your ibrik and place it on medium heat. Wait roughly 2 minutes, and then add the grounds into the ibrik. Do not stir the grounds. Sugar is added by some people who know they prefer it in their brew. If you would like to do this, add sugar on top right after you add the coffee. We recommend a teaspoon to start and you can adjust accordingly next time you brew based on your preferences. Again, do not stir. Brewing : Once the coffee starts sinking and the sugar begins to dissolve, you can give the coffee a few quick stirs and turn down the heat just a bit. Your coffee will soon begin to bubble a bit on the surface. When you see small bubbles, make sure you turn down the heat even lower. Keep a close eye on your brew – don’t let it boil. A froth will start to rise to the surface. When it does this, remove from heat and let it settle. Once the froth has gone down, put it back on the heat and let it rise once more. Some prefer to let it rise and fall 3-4 times, but we recommend only twice. Pouring : Take care when pouring your Turkish coffee from the ibrik – Give it a quick initial pour to get the foam, then slow down so most the coffee grounds will stay in the bottom of the vessel and not fall into your cup. Enjoy! - Let it sit for a minute or two, so any grounds that might have slipped into your cup can settle at the bottom. Sit back and enjoy.
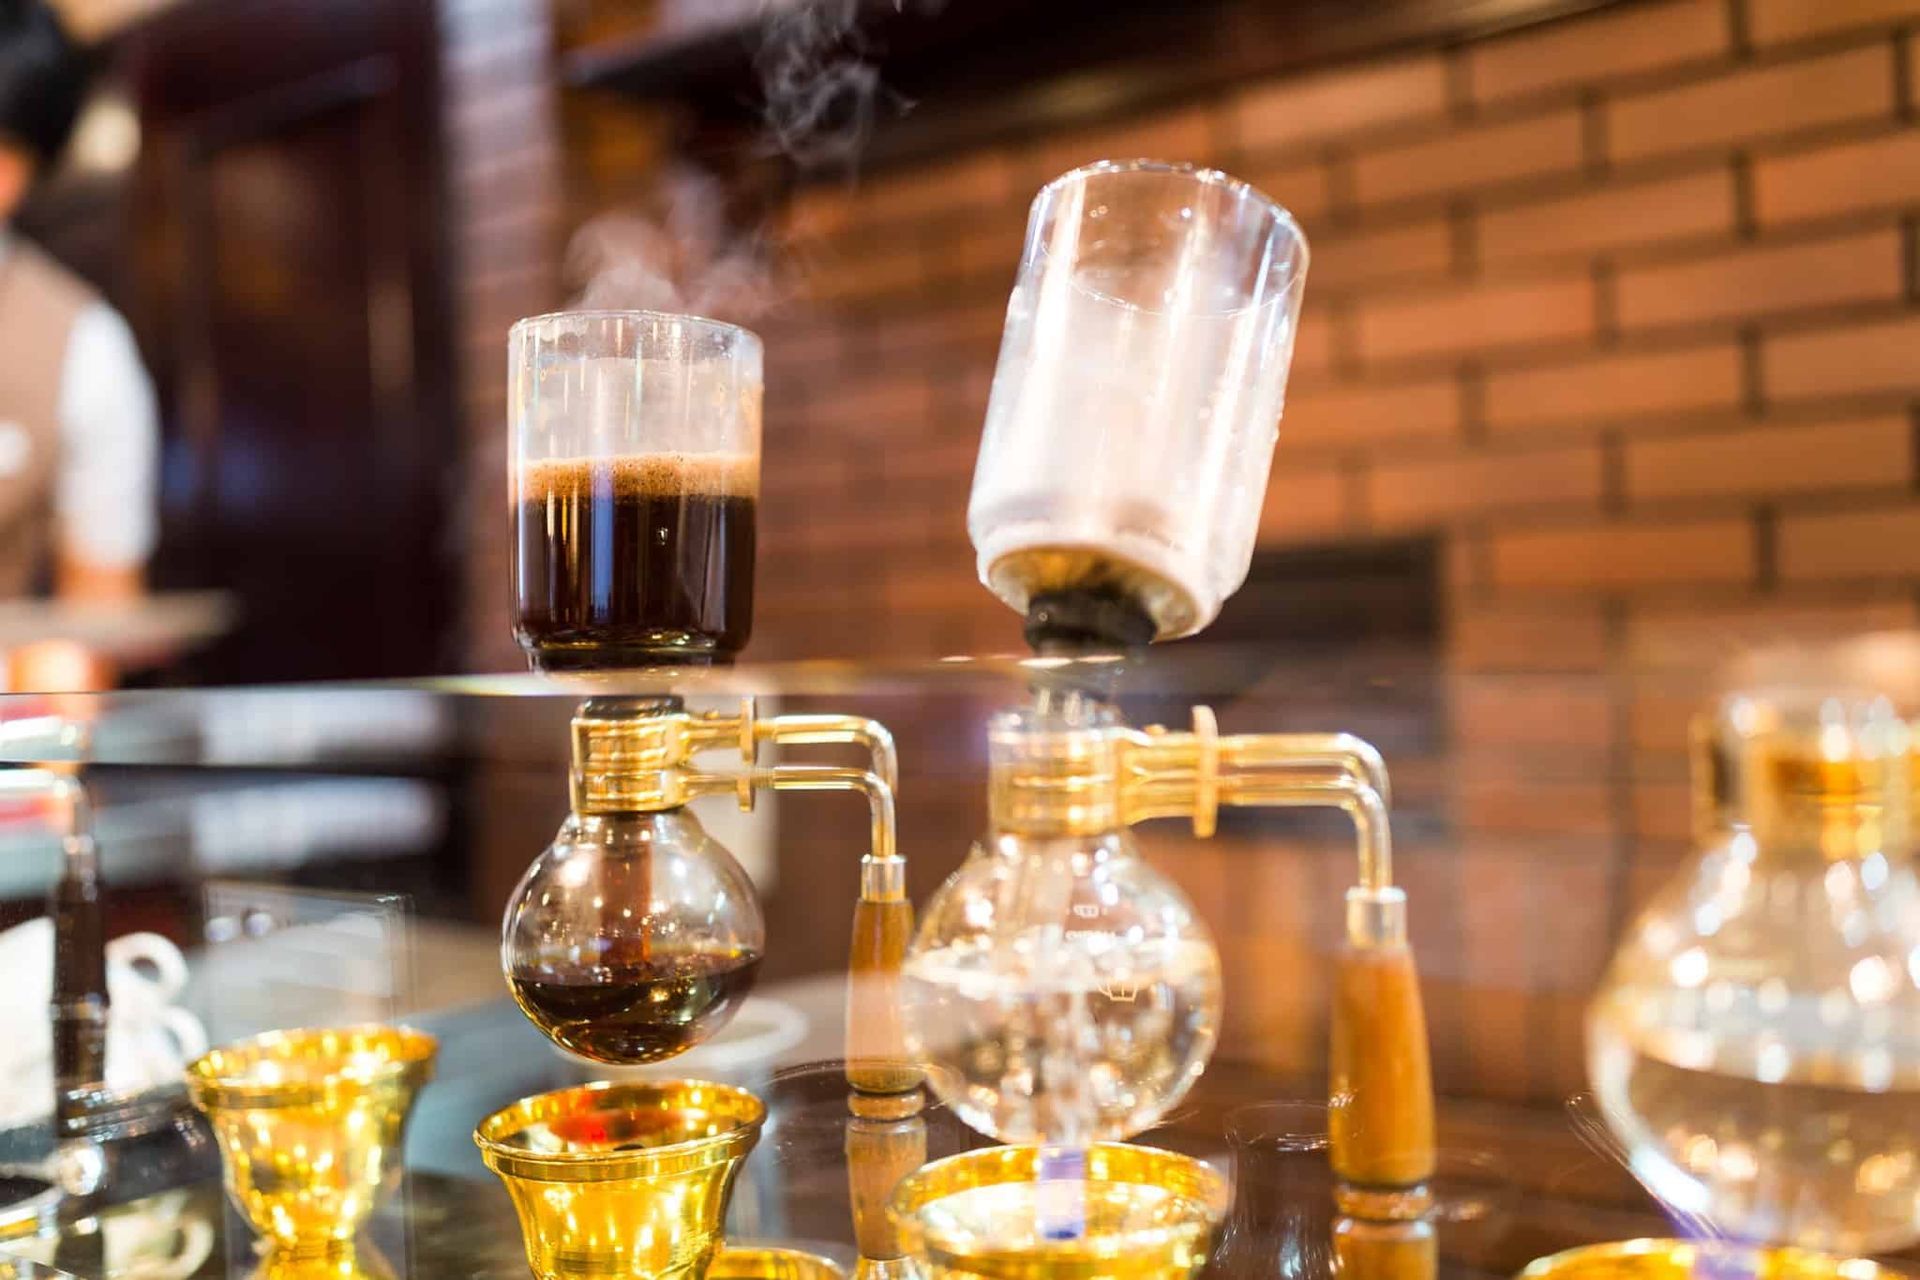
The history of Syphon began with a french woman in the mid 1800s, who designed a beautiful coffee brewer that was intended to be displayed at dinner parties during the brew. Over the years, companies across the globe have designed and sold their own versions of the Syphon. The stovetop and burner versions, both of which are manufactured in Japan, are the most popular versions available today. For this brew, we’ve used the Hario 5 cup Syphon.Syphon brewing is rather advanced, and takes roughly 12 minutes. What You Need Coffee Syphon Coffee Filter Gooseneck Kettle Burr Grinder Water Directions Amounts : 3 tbsp coffee & 15oz water (3 cup syphon) 4 tbsp coffee & 22oz water (5 cup syphon) 8 tbsp coffee & 40oz water (8 cup syphon) 24 grams coffee & 443 grams water (3 cup syphon) 32 grams coffee & 650 grams water (5 cup syphon) 64 grams coffee & 1182 grams water (8 cup syphon) Grounds : You’ll need 1 tablespoon of coffee for every 5 ounces of water, ground on a medium grind (a #6 grind on an industrial machine). Filter : To start, you’ll want to assemble your filter. We used a cloth filter on our syphon, but other options are available as well – such as glass, paper, or metal/mesh. If you are using a cloth filter, make sure to soak it in boiling water for a few minutes before your first brew. Drop the filter into the top chamber and use the chain to properly hook it on at the bottom. Assembly : Fill the “bulb” or lower chamber up with water to the designated fill line and assemble the syphon (don’t forget to put the lid on the top chamber). Slide your Syphon over the heat source. We are using the small wick burner that came with our Syphon, and have filled it with denatured alcohol (a clean burning fuel), which can be purchased from your local hardware store. You’ll need the wick to be tall enough that the flame touches the bottom of the Syphon. Begin Brew : As it heats, the water will start to move up the chain to the second chamber. When all the water has reached the top, pop off the lid and check the temperature. Adjust the heat source accordingly, so your water is approximately 190 degrees. Adding Grounds : Place the grounds into the chamber and use a bamboo paddle or chopstick to give it a quick, gentle stir. Replace the lid and let the coffee steep. Brewing : For a smaller syphon (3 cup), wait 45 seconds. For a larger one (5-8 cup), wait just over 1 minute. Finishing Brew : Give the coffee another quick stir and then remove the syphon from the heat source. Soon, the coffee will begin to be pulled back down into the bulb. You will know this process is complete when the grounds have formed a small mound in the upper chamber. Enjoy! - You can now remove the top components and use the bottom carafe to serve your coffee.
